Showing posts with label Jessie's' Homemade Home. Show all posts

Thursday, 22 May 2014

Blanket Inspiration

I'm crocheting a blanket, and my goodness its a slow process (duh!). The blanket is getting bigger slowly, but the massive ball of yarn I bought doesn't seem to have got any smaller.. (this is frustrating because I'm not following any instructions for this one. I'm literally just gonna keep going till I run out of wool.)


In an effort to keep myself inspired, I've been browsing Pintrest (of course), and I thought I'd share the some of my favourite pins with you. Because crochet is super beautiful.


- Colour blocking - 
- Be still my beating heart. Love those muted shades - 
- Technical skills to aim for - 
- Granny squares -
- Bright stripes -
- Splashes of mustard -
- Squares within squares -
- Pretty blues and greens -
- I spy the Eiffel tower -


Much Love,
Jess
xxxx

Links found:
 here, here, and  here, 

Wednesday, 7 May 2014

The Painted House

A while back I visited The Makery, and had a total blast making a lampshade (which is still sitting in a bag in my room, waiting for a base..). Last week I finally got around to playing with my rollers at home.

I decided to roller the inside doors of my wardrobe. This seemed to me to be the perfect location to practice, since if it worked, it would look really awesome (lets face it, my wardrobe doors are always left open anyways), and if it didn't work, and I didn't like it, it would be really easy to hid away.

before

Having been given strict instructions not to use the rollers on gloss paint, I began by sanding the satin finish on the doors. My plan had been to take the original white of the doors and print with a subtle grey paint.

However, when the instructions say to paint only on a matt emulsion (Annie Sloans' chalk paints are highly recommended) they really do mean it. Even after sanding, my satin finish doors were too slippy to afford the rubber pattern roller any grip, meaning it just smudged right down the door. Not a good look. I couldn't even bring myself to photograph it.

Plan B: Paint the doors matt, and try again. In an attempt to save monies, I wanted to use a colour we already had. So I went for this greeny-blue that we'd used on the kitchen. Having changed the door colour, I decided to go for a white paint for the rollers, in keeping with the white and blue colour scheme of my room.

Laura Ashley: Cotton White 

After the long old process of priming and painting several coats of my chosen colour (fitting painting around my work schedule) I was ready to roll. eek!

As per instructed at The Makery I began by loading my foam roller with paint, which is easier to do on a flat surface than in a paint tray because of the prongs. I then layed the roller off on a blank piece of wall paper. Having attached my rubber roller, I layed it off again (to get rid of any excess paint and ensure an even roll on the door itself). This also gave me a chance to check that my roller was on the right way up- it would be the worst to have done your first roll before you realized your print was upside down!

 keep rollin' till you hear the paint getting tacky. You'll know it when you hear it. Promise.

the deeper the line of paint in the roller, the less often you'll have to reload. 

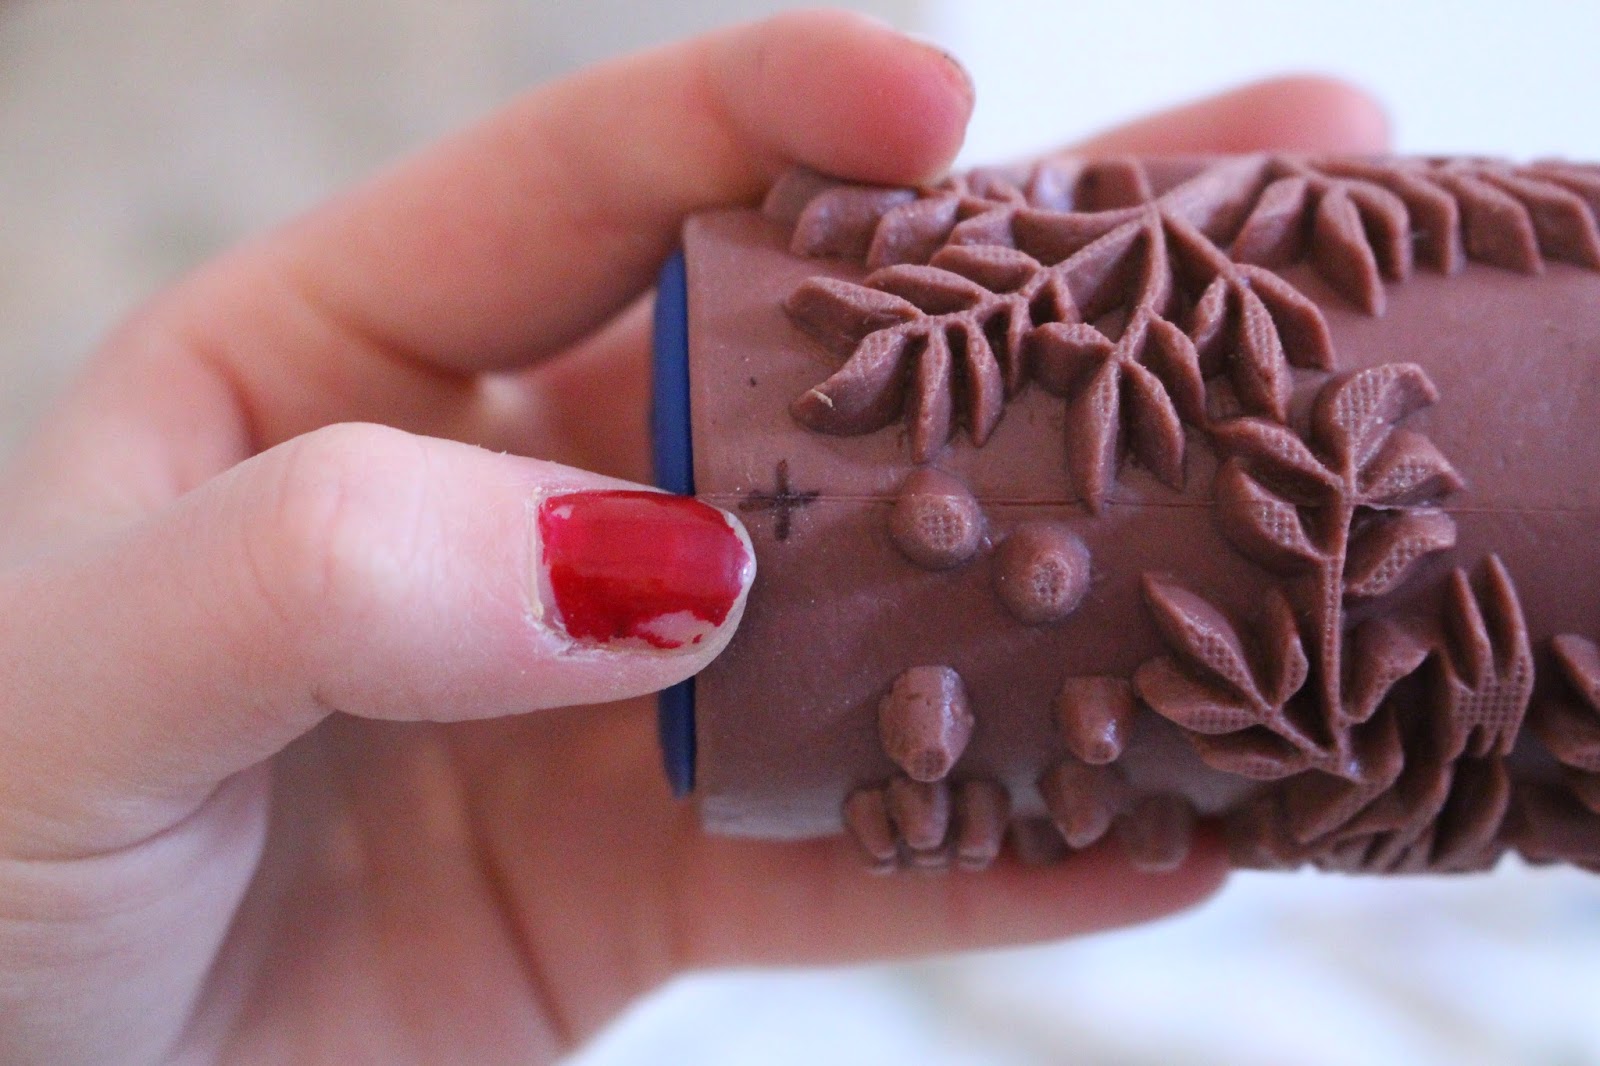
The Makery suggested drawing a + and - on the roller to enable you to line up the pattern right (if you start with a + at the top on the first roll, ensure you have a - at the top on the second roll). Beyond that, the process is pretty self explanatory. After I was done I also decided to add some dots by hand to hide any joins between the strips.

 Chipped nails. Bad Jess.

Check out the concentration on that face

I'm pretty happy with the results. It was actually a little harder than expected, and some of my rolls did smudge a bit (possibly because of the length of the door, or perhaps my pressure on the roller was wrong..). But this was a good first attempt, and I think with practice I could work out the kinks. Overall, Im pleased!

 Close Up | Paint 

Finished! It doesn't look so bad from a distance! 

If you wanna learn more about this way of printing, check out The Painted House or book a course at The Makery 

Much Love, 
Jessie
xxxx

Wednesday, 19 March 2014

The Makery

So I've been a very bad blogger of late, a very very bad blogger, and its not just the blog that's taken a hit; I got a 'line a day' diary for Christmas, and I've been so great at keeping it up to date. Up till now. I couldn't even manage one measly line a day. Siiiiigh.

I've had a horrid cold, and works been pretty busy, but last night I finally put pen to paper again, and now I'm finally getting round to telling you about one of my most recent adventures; for my 21st Birthday, waaaaaaaay back when, one of my favorite families in all the world gave me a voucher for a place in town called The Makery.

The Makery is a beautiful magical place in bath. They have two stores, one a teeny tiny adorable haberdashery hidden away down a quaint side street full of fat quarters, ribbons and buttons. Its delightful. The other store, a little way out of town, is where they hold all their workshops and hen parties, and this was where I was headed one sunny Friday morning a few weeks back.

The workshop I chose was succinctly named 'Print your own Wallpaper, Fabric & Furniture (And make a lampshade!)' but don't let that put you off! I had the best day! As the name indicates, we spent the day printing our own fabrics, which we made into a drum lampshade.

I'm sure loads of you have seen those awesome rollers pioneered by the painted house, and featured on the Great Interior Design Challenge (and ya know, allll over pintrest), and I got to play with them to my hearts content.


In the end I chose the imaginatively named roller no. 6,  the deer print, for my lampshade. Now I just need to find a lamp to put it on...


I was so impressed with the rollers that I actually ended up buying a kit (I probably should have just got them online, its definitely cheaper, but I'm just so childishly impatient..). I can't wait to start decorating all the stuff in my room. Watch out wardrobe, you're first. (and I pinky promise a full blog post/tutorial once I'm done!)

 photo output_uiUvL8_zps150b7024.gif


Side note, if anyone is feeling especially inspired (and you should be, its so easy, and so effective!), you can pick up a lampshade making kit from The Makery here, and the rollers from the painted house here

Hope you're all well my darlings
Much Love
Jess
xxxx

Tuesday, 25 June 2013

Guess Whose Back..

Soo.. I've been a little absent of late; I was sadly forced to make the mature decision to focus on my education for a while (it paid off, just so ya know). But, I'm back now. For good. Promise.  :)

So. Lets talk Bunting. Yeah, I know, its been done a lot- a quick Google for bunting tutorials resulted in a plethora of different ways to create that instantly recognizable British staple. But on the off chance you're interested, here's how I do mine. I like to think I've got it down to a bit of an art these days; since finishing my degree I've made about 20 meters of the stuff in preparation for the various parties my fam will be hosting this summer!

This particular row of bunting has been inspired by my time living by the sea- its gonna be a little bit of Falmouth in my bedroom in Bath.
Ok, so to begin, create your pendant template (I opted for quite a large triangle, a) because it will be used in a large space, and I dont want it to get 'lost'. and b) because that means less work for me, yay!). Next, cut a strip of fabric the same height as your pendant, and draw out your triangles. 
Once you have cut out all your triangles, pin, and then stitch the shapes together, ensuring you've placed the  rights sides together. There are of course tutorials out there which use only one single sided pendants, but I think this method creates a more professional end product.
Next, I popped on the iron (actually the first time the iron has been used in my student house since we moved in two years ago..) and ironed the triangles rights sides out. Whilst I was at it I also ironed the tape I had bought in half. Most tutorials use proper bias tape, but I invented this method in my head way back when, before I had ever even heard of bias tape, and I just kinda stuck with this method.
I then just combined all the elements; pinning the pendants inside the tape. (I realize here most people would leave a gap between the triangles, but personally, I prefer the look of this method- thought sadly it is less economical fabric-wise)
Finally, sew along the edge of the tape, trapping the bunting within. Et voila! Fini!

1) my template was 9.5" along the shorter edge, and 10.75" along the two longer sides. 2&3) pinning and stitching the rights sides together. 4) pinning the pendants within the tape. 5) the whole thing comes together! 
Much Love, 
Jess
xxxx

Tuesday, 1 January 2013

Oh Christmas Tree, Oh Christmas Tree.

So this post is long overdue... like a year overdue... I started this project at Christmas last year, and never finished it; it wasn't till I found it, half finished, shoved into a Sainsburys bag in the back of my wardrobe that I remembered about it at all! and so the other evening I finally sat down in front of the tv (I always seem to craft in front of the tv..) and I managed to finish it, just in time for Christmas!

1) My Christmas tree bunting in situ 2) I picked some pretty flowery fabric to match the blue kitchen (I stole it from my mums fabric stash, yay for free stuff!). 3) I had hoped to hang the bunting above the aga, but unfortunately the wall was too solid to get any pins in, so they had to be pushed into the cracks in the ancient beam. 

I was inspired in this project when I was watching Kirsties Homemade Home a few years back, she had something similar hanging above her own aga, and I wanted to create my own version. 
It was super simple to make, as with the stars I made for my Christmas tree it was simply a case of cutting out the shapes and stitching two together with the right sides facing (don't forget to leave a hole to turn them back the right way, and to insert the stuffing!) I then stitched up the hole by hand and attached the tree's to some blue ribbon, with a bell (to make a super Chirstmassy jingle whenever anyone tall walked into them- not a problem I had, being so little..)
I'm so pleased with the results- even if they are a year late.. 

Much Love, 
Jess.
xxxx

Wednesday, 12 December 2012

Christmas Is Coming...

Christmas is nearly here, and like the child that we all know I am, I am super excited! (though I couldn't say if this is because of Christmas itself, or the prospect of going home for a bit to see my fam.)
That said, what with all the work I've had lately, I've hardly had much of a chance to get decorating, but, the other night, after completing an assignment, I rewarded myself with an evening making some pretty stars for my tree:

1) Im so glad I made them, as it turns out, I left all my other tree decorations at home, so without these my tree would be so very naked! 2) The stars in situ. 3) I love the tartan, it looks so festive! 

They were so simple to make, it was just a case of stitching round the shape, with the right sides together, and the ribbon trapped inside. I'll admit, they look a little wibbly and unsymmetrical  but I like to think that's part of their charm.. Im so happy with them!

Much Love, 
Jessie.
xxxx

Monday, 10 December 2012

A Cautionary Tale.

Today's post is full of helpful advice for life: Firstly, no matter how cool it might seem at the time, and no matter how awesome the screen might be for watching movies and playing sims (yes, I really am that cool) a 17 inch laptop is just not practical.
Not only is it super heavy, they also don't make cute covers for laptops this big, (perhaps because no one actually expects you to carry the thing anywhere) but it eventually got to the stage where the two supermarket bags I was using to protect it from the elements no longer cut it. I suppose I shouldn't be surprised,  how was Mr Sainsburys supposed to compete with the torrential rain we suffered recently!?
So I decided to attempt a diy laptop case... and here comes advice for life number 2: follow instructions and measure!!
I just picked up some oil cloth and wadding from the trago mills in town and decided to blag it... I love to make things, but boy did I find this approach to diy stressful.

1) My laptop- snug as a bug in a rug. 2) Its so pink! 3) All ready to be studious in the Library

Im pretty pleased with the results; I think its cute, and you can hardly see the imperfections from a distance, hehe. A couple of people have actually been so kind as to compliment me on the adorable fabric (apparently it looks very cath kidston, Such praise!). That said, I think if I was to make another, I would make sure to measure more carefully-  I had to trim it smaller about 4 times because I over estimated the size of my laptop- such a kerfuffle. Also I think in future I would make the corners curved; I think it would look neater that way, and it would certainly be easier on my sewing machine (the poor thing struggled with the thick oil cloth, and I think getting round the corners was almost one step too far..) 

Much Love,
Jessie.
xxxx

Tuesday, 27 November 2012

My adventures in stamping.

So way way back before the summer (oh how that feels like a lifetime ago- third year you have not been kind), I made my first cushion.. and since then I've been a little addicted.. its just so easy to make something so cool!

So having mastered a basic cushion, I thought I'd try something a bit different; I thought I'd try printing my own fabric. That said, stamps are pretty expensive for what they are, so having read a few blog posts at a beautiful mess, I felt inspired to attempt my own.

Using some craft foam and a block of wood I found lying round in the cellar, I created my very own bunny stamp. I then proceeded to stamp some plain white fabric with blue fabric paint- it was honestly as simple as it sounds; seriously, the most difficult part was the ironing needed to fix the dye, and that was only because I so disprove of ironing on principle. hehe.

1) The cushion in its new home. I love it! Though perhaps its a little odd to keep the bunnies next to the fox.. 2) my fabric 3) the stamp! (I printed a bunny on paper, cut it out and stuck it to the other side, just like a professional stamp!) 

I am so so pleased with the result! Within the space of an hour I had made my very own individual fabric, that is utterly unique, and a stamp that I can use again  for other projects. :)

Much Love, 
Jess. 
xxxx

Friday, 26 October 2012

Homemade Hand warmers.

So a while back, before the weather turned, I was desperately trying to procrastinate from my dissertation, so thought it would be a REALLY good idea start preping for the winter months. (just to put it out there.. it wasn't.. with hindsight, I probably should have just got on with the dissertation, hehe.)

As is the case with many other bloggers, I love pintrest; I find it an invaluable source of inspiration, so naturally my next move was to search through their archives to find the perfect pocket hand warmers. And boy did I hit the jack-pot with this pair.  They're so adorable, and so easy to make using bits and bobs I had lying around in my house.

1) I adapted the original design, by embroidering 'love' into one, and the cross stitch heart onto the other. 2) the back- its so simple, and I love how homemade they look with the wobbly stitching. I like to think it adds character..

I am so pleased with these; they were super fast to make, just one evening in front of the telly, and you've got a finished product. And they've been so useful already, I just pop them into the microwave for 30 seconds, and my hands stay nice and toasty for a good half and hour (perfect for those early mornings at the bus stop). Such a great idea- kudos pintrest.

Much Love, 
Jess.
xxxx

Friday, 19 October 2012

The Cushion Addiction Continues..

Soo... A while back I posted about making my first ever cushion cover for my room at University. Right there and then I described how pleased I was with the result, and predicted that I may have caught the cushion making bug. And boy was I right!

Since that post, I updated three cushions for my bed at home, and made another for my University room- An adorable little fox-face.

I had been scrolling through back posts of my absolute favorite blog, when I spotted this cushion which popped up in post after post, it looked so cute and colorful, and I immediately fell in love with it. (You can buy your own here).

In typical student style, I felt opposed to the idea of spending even £26 for something I felt confident I could make myself from scraps of fabric we had lying around at home. So I set to work creating a template for my cheeky fox.

1) My own little fox-face, those ears cradle my neck perfectly. 2) The 3d detailing. This is the first time I have attempted anything more complex than just putting two sides together. So happy with the results. 3) Fox-face's new home.

My cushion is similar in shape to the urban outfitters original, but I made it from denim (because a) we had some spare, b) its hard wearing and c) the stiffness of the fabric made creating the 3d shape easier). The floral fabric for the ears and mouth is scraps from fabric I used for the cushions I made for home, and the nose and eyes are made of black fleece. I stitched them all on using a zig-zag machine stitch to minimize fraying.  I LOVE how tactile this piece is with all the different textures and colors!  I am so pleased with this project (even my dad, who is hardly ever overly enthusiastic about anything, described it as 'fantastic' - which is doubly impressive when you consider that he is a farmer, and as such automatically hates all things fox related).

I wish I could say the cushion obsession was over.. but its not.. stay tuned..

Much Love, 
Jess
xxxx

Tuesday, 16 October 2012

Notice Board DIY

I recently discovered this great blog (ashley-ann has such a beautiful family, and it has been so wonderful to be able to follow them on their journey as they adopted their youngest daughter), and I was so inspired by this awesome diy- I think I was attracted to the yellow frame. I have such a thing for yellow.

I was instantly inspired to create my own chicken wire peg board, but where ashley-ann was able to re-purpose an old mirror from elsewhere in her home, I didn't have that luxury. Since frames can be so expensive to buy (especially very large ones), my mother and I put our heads together, and struck upon a plan; to make one ourselves.

So part one of the DIY began- we bought some wooden molding from Homebase, and cut it to size using a  miter saw (the beauty of which is that it allows you to determine accurately the angle of your cut- meaning achieving the 90 degree angles needed for a professional looking frame was a doddle.) Having screwed the frame together, I treated all the knots with some specialist chemicals (because apparently that's something you have to do..) and finally slapped on a coat of paint- I bought a tiny sample pot of blue paint, again from Homebase.

1.The Mitre Saw 2.Joining the frame 3. A handful of teeny tiny staples. 4. Attaching the Chicken Wire (be sure to hammer the staples in at the deepest point of your frame- you don't want any pointy staples poking through at the front!).

Step Two was to attach the wire to the back of my frame using some tiny staples. This turned out to be SUCH a kerfuffle- it kept trying to curl back up upon itself (it had been stored in a massive roll). Apparently I learned nothing from my previous chicken wire experience- once again my poor arms were scratched to ribbons. (ok. That's an exaggeration. but still. for someone who has used it before, I sure was dumb to not to have been more careful).

Finished!

I'm so pleased with the end results though, and making the frame myself meant I was able to create a huge board suitable for holding all my dissertation paraphernalia.

Much Love, 
Jess
xxxx

Tuesday, 9 October 2012

I Caught The Cushion Bug.

So as predicted, I have caught the cushion bug, and I caught it bad. They are just so easy to make, but can look so effective!

I had a number of cushions on my bed at home, that had been given to me by various people long ago, that were so mismatched and random, and totally didn't fit the look of my room. So I set about to rectify this situation.

Once again, I raided my mothers amazing sewing room for bits and bobs and spare bits of fabric (the white of the elephant cushion is an old sheet with holes in it). All of the cushions are just simple envelope cushions (using the same method seen here).

 To create the top cover, I simply Machine stitched the design to the cover using a zig-zag stitch in a contrasting color (in this case, pink against the blue floral fabric) to minimize fraying.
The second cover was one my mother made for me years ago, and as there was nothing wrong with the cover itself, I decided to keep, but customize it. Using pinking shears to minimize fraying, I cut hearts from the same fabric as the bottom cushion (with one contrasting heart in the same fabric of the elephants) I then hand stitched them too the cover. Ideally I would have liked to have been able to zig-zag them, like the elephants, but that would have been impossible due to the cover being already made. I could have appliqued them by hand, folding under the edges to stop fraying, but unfortunately, I lack the patience. Thankfully I actually quite like the effect of the pinking shears, so its all good.
The final and simplest cushion is just a simple envelope cushion in a pretty blue floral fabric- I thought it was such a lovely fabric, there was no need to embellish it any further with any applique.

I'm so pleased with the results, and I feel like the use of the matching fabrics really ties it all together, and fits in perfectly with the rest of my little blue room (it helps that the fabrics also match the bunting over my desk).

Much Love. 
Jess. 
xxxx

Tuesday, 3 July 2012

Welcome, Sven.

So my favorite littlest -as opposed to my favorite little- sister has declared the moose to be called Sven, and guess what- He's finished! It was actually more work than I was expecting, but I'm so pleased with the results, and I learned some new skills along the way; he was heavier than I though, so he needed properly screwing into the wall, which meant my mum and I got to play about with the power tools.

Last time I blogged about this project, I was undecided weather I should decoupage the head, or simply paint it. In the end, I decided to paint it- I thought perhaps decoupage might look too 'busy' in the small stairway, and also I figured if I painted it, and didn't like it, it would be easier to decoupage on top, rather than the other way round.

Following my dads advice, I painted first with a layer of undercoat, and then with two coats of white emulsion. I toyed with the idea of painting the moose pink or blue or something, but in the end, just left it white, and I'm so glad I did- it looks so sleek and modern and the white fits in perfectly. I so so pleased with it. 


1) The finished result- So awesome! 2) I made some bunting from old wrapping paper to hang from his antlers- I love the idea that I can change it seasonally. 3) Sven in situ. 


Much Love.
Jess
xxx

Thursday, 28 June 2012

Progress on the Moose front.

Yes. you did read that correctly- the stags head accidentally evolved into a moose. I began by crafting the shape from chicken wire* and it sorta maybe kinda turned out a little bigger than I had planned- though all totally in proportion thank goodness.

1)The completed Frame. 2) Papier-mâché-ing in the sun. 3) The Next step.. (stay tuned)

I then went on to Papier-mâché-the frame, using newspaper and wallpaper paste- I considered using flour and water, but a) we already had wallpaper paste left over from decorating, and b) unlike the flour and water glue, its mould resistant. The process was totally relaxing, just sitting in the garden in the sun, which incidentally was great for drying the layers really quick. I honestly don't think I've Papier-mâchéd since like year 5, and I'd forgotten how fun it is- its so hands on, a totally different experience from sewing. In the end, I did just 4 layers of Papier-mâché, and am now at the stage of deciding weather to decoupage, or simply paint the sculpture.. 


So excited to see the end results! :)

Much Love, 
Jessie
xxxx


*Note-to-self and anyone else who wants to give this sort of project a go, make sure you are wearing a jumper, or some kinda protective garment- that stuff is super sharp! I pretty impressively ruined a pair of jeans and scratched up my arm when I was cutting up the chicken wire, (the boyf was actually a bit concerned I'd been self-harming)

Thursday, 14 June 2012

Jess Goes Impulse Shopping. Again.

So the other morning, I woke up and though, 'you know what, I want a chalk board.' As you do. So I headed down to the Trago Mills in town on the hunt for a board.

What I had in mind was a cute little board with a nice wooden frame to match the other furniture in my room. However, Trago was not up for cooperating. All they had in stock was a kids chalk board with a frame painted in gaudy primary colors- totally not the classy chalk board I had in mind.

Thankfully, inspiration struck, and I decided to decoupage the frame, so I headed to this adorable little shop in town where they sell wrapping paper off cuts at like 20p a piece. So I grabbed 3 pieces of this lovely flowery green paper, the color of which matches the lomography camera that hangs on the wall over my bed. All I had to do was attach the paper to the frame, using some PVA I found in a draw. As was the case with the cushion, the project was so simple, so cheap, and the results are so effective. It looks super cute, and will be totally useful for noting deadlines, birthdays, shopping lists, or just inspirational messages.

1. A close up of the pretty paper. 2. 'Chill Out' Note to self- Don't panic about the results being released tomorrow. Possible future message: 'what will be will be'. 3. The board in situ.

Much Love, 
Jessie 
xxxx

Tuesday, 12 June 2012

Cushion Time.

As is perhaps the case with all young people, I love my bed! When I moved to university two years ago I was finally given the opportunity to invest in the set of classic white sheets I had always longed for. However, I have had a nagging feeling for a while that my bed was missing something; a beautiful cushion.

I searched long and hard through Ikea,Trago Mills and the like, but struggled to find anything to match the colors of my room, let alone my personality. Perhaps its just me being a bit mental, but I totally struggled with the idea of buying a cushion just because- I felt it ought to represent something about me, and as pretty as a pattern of tea cups or a union jack print may be, i just found them to lack a certain something. And don't even get me started on the price! Possibly it is a symptom of student living, but the idea of spending £10- £15 on something I could make for mere pennies just seemed so wrong.

Spending a weekend with my family recently gave me the perfect opportunity to remedy this situation, as I raided my mothers sewing room, and nabbed myself a cushion, some old sheet fabric, and a handful of buttons from a box labeled 'odd buttons'.

I found a tutorial online here, for a simple envelope cushion, decorated with a button heart. The design was so simple, but looks so effective, and I was able to pick button colors that complimented the color scheme of my room. The project was so easy, I completed it within the time constraints of my weekend at home -though perhaps I would have finished even sooner if I hadn't been such a perfectionist about it, insisting on moving a number of the buttons on a number of occasions to get the effect I was looking for. My sister looked at me as if I was crazy as I unpicked yet another button and placed it back down milometers from its original position.

1. The cushion in situ. 2. A close up on the buttons - my favorite was a spare jack wills one I found in my room, I love the brand, and associate the shirt for which this button was a spare with many happy memories. 3) The cushion, I included blue, pink and green buttons to tie in with my room. 

Overall, I was so pleased with the finished result, especially since it was my first attempt at creating a cushion cover (its long over due I know), there's just something about creating something yourself, I feel so proud every time I look at it. It looks so great in my room, and totally completes my bed -though this is not to say that I have ruled out making more, I can sense I might get a little addicted.


Much Love, 
Jessie
xxxx